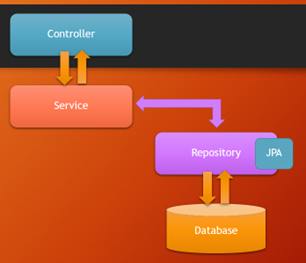
Repository pattern เป็น แพทเทิร์นหนึ่งที่ช่วยให้การเข้าถึงฐานข้อมูลเป็นไปอย่างมีระเบียบและ สามารถทำการทดสอบได้ง่ายขึ้น โดยแพทเทิร์นนี้จะแยกการเข้าถึงข้อมูลออกจากโค้ดของแอปพลิเคชัน ซึ่งช่วยให้เราสามารถเปลี่ยนแปลงฐานข้อมูลหรือเปลี่ยนโครงสร้างของข้อมูลได้โดย ไม่ต้องเปลี่ยนแปลงโค้ดของแอปพลิเคชันซึ่งทำให้ง่ายต่อการบำรุงรักษาและพัฒนาต่อยอด
Java Spring Boot มีการสนับสนุน Repository pattern ผ่าน Spring Data JPA ซึ่งเป็นการออกแบบและพัฒนาชุดเครื่องมือที่ช่วยให้การจัดการกับฐานข้อมูลเป็นไปอย่างมีประสิทธิภาพและง่ายต่อการใช้งาน โดย Spring Data JPA จะทำการสร้าง Implementation ของ Repository โดยอัตโนมัติจาก Interface Repository ที่เราสร้างขึ้นมา โดยเราสามารถกำหนด Method ที่ต้องการใช้งานได้และ Spring Data JPA จะทำการสร้าง Query ให้เราโดยอัตโนมัติจากชื่อ Method ที่เรากำหนด
Spring Data JPA เป็นโครงการที่ช่วยให้เราสามารถเข้าถึงฐานข้อมูลของเราได้อย่างง่ายดายโดยใช้ Java Persistence API (JPA) และ Spring Framework โดยไม่จำเป็นต้องเขียนโค้ด SQL โดยตรง โดย Spring Data JPA ช่วยเราในการเขียนโค้ดโดยทำให้เราสามารถสร้าง Repository สำหรับเชื่อมต่อกับฐานข้อมูลและเรียกใช้เมธอดต่างๆ โดยที่เราไม่ต้องเขียนโค้ด SQL โดยตรง โดย Spring Data JPA ยังช่วยในการจัดการกับการสร้างและจัดการ Entity ซึ่งเป็น Object ที่แทนข้อมูลในฐานข้อมูล เพื่อให้การเข้าถึงฐานข้อมูลและการจัดการ Entity ง่ายและปลอดภัยมากยิ่งขึ้นในแอพพลิเคชั่นของเรา
ตัวอย่างการสร้าง Repository ใน Java Spring Boot ด้วย Spring Data JPA ดังนี้
1. กำหนด Entity Class และ Primary Key ของตาราง เช่น ตัวอย่างตาราง users เราจะสร้างเป็น Class User.java
| User.java |
|
@Entity เป็น Annotation ที่ใช้สำหรับระบุว่าคลาสนั้นเป็น Entity Class ซึ่งจะถูก map กับตารางในฐานข้อมูล และจะมีการสร้าง instance ของ Entity นี้เมื่อมีการเรียกใช้งาน method ของ repository ที่เกี่ยวข้องกับ Entity นี้
จากตัวอย่างข้างต้น เราใช้ @Entity ในการระบุว่าคลาสนี้เป็น Entity Class ซึ่งจะถูก map กับตาราง users ในฐานข้อมูล โดยใช้ @Table สำหรับระบุชื่อตาราง และใช้ @Id และ @GeneratedValue สำหรับระบุ primary key และการกำหนดวิธีการ generate primary key ตามลำดับ นอกจากนี้ยังมี @Column สำหรับกำหนดคุณสมบัติของ column ในตาราง เช่น การกำหนด constraint และการกำหนดค่า default โดยทั่วไปแล้วการใช้ @Entity จะช่วยให้เราสามารถ map คลาสไปยังฐานข้อมูลได้อย่างถูกต้องและง่ายดาย และช่วยให้เราสามารถเรียกใช้ repository method ที่เกี่ยวข้องกับ Entity ได้ง่ายขึ้นด้วยการสร้าง instance ของ Entity นี้ผ่าน repository method ที่เรียกใช้งาน
@Table เป็น Annotation ที่ใช้สำหรับระบุชื่อตารางในฐานข้อมูลที่ Entity Class ต้องการใช้ หรือระบุค่า default สำหรับหลายๆคุณสมบัติของ column ในตาราง
2. สร้าง Interface Repository โดย extends JpaRepository ของ Spring Data JPA
| UserRepository.java |
|
@Repository เป็น Annotation ที่ใช้สำหรับประกาศ Class เป็น Repository Layer ที่ใช้ในการเข้าถึงฐานข้อมูล โดย Repository Layer เป็นตัวกลางในการเชื่อมต่อกับฐานข้อมูลและเป็นที่เก็บข้อมูลจากฐานข้อมูล
การใช้ @Repository เพื่อประกาศ Class เป็น Repository Layer จะช่วยให้เราแยก Logic ที่เกี่ยวข้องกับการเชื่อมต่อฐานข้อมูลออกจาก Controller และ Service Layer ซึ่งทำให้เราสามารถทำการทดสอบเพียงฐานข้อมูลได้อย่างอิสระและง่ายขึ้น
UserRepository เป็น interface ใน Java Spring Boot ที่ถูกสร้างขึ้นมาเพื่อใช้ในการเข้าถึงข้อมูลในฐานข้อมูลเกี่ยวกับ entity User โดยใช้ Spring Data JPA ซึ่งมีการ extends จาก JpaRepository ซึ่งเป็น interface ที่เป็น generic interface ที่ให้เราเข้าถึงฐานข้อมูลโดยอัตโนมัติ โดยไม่ต้องเขียนโค้ด SQL เอง
ใน UserRepository interface นี้จะประกอบไปด้วย method ต่างๆที่ใช้สำหรับ query ข้อมูลจากฐานข้อมูล เช่น findAll(), findById(), save(), deleteById(), count() และอื่นๆ ซึ่งมีจำนวนมาก ๆ และชื่อแต่ละ method จะเป็นไปตามกฏการตั้งชื่อของ Spring Data JPA ซึ่งจะใช้ชื่อ method ให้ตรงกับแบบฟอร์มของคำสั่ง SQL ต่างๆ เช่น findByXXX(), deleteByXXX(), countByXXX() และอื่นๆ โดย XXX จะแทนด้วยชื่อ property หรือ column ใน entity class ที่เราต้องการ query
JpaRepository<User, Long> เป็น interface ของ Spring Data JPA ที่ใช้สำหรับเข้าถึงฐานข้อมูลสำหรับ entity User ซึ่งมีการระบุ generic type ของ entity class และ type ของ primary key ของ entity นั้น ๆ ซึ่งในกรณีนี้คือ User และ Long ตามลำดับ
ดังนั้นการสร้าง interface สำหรับเข้าถึงฐานข้อมูลโดยใช้ Spring Data JPA จะช่วยลดความซับซ้อนและความซ้ำซ้อนในการเขียนโค้ด query ของ SQL และช่วยให้โค้ดดูสะอาดและอ่านง่ายมากขึ้น.
3.สร้าง Service Class
การใช้ Repository ใน Service Class เป็นส่วนสำคัญในการออกแบบและพัฒนาแอปพลิเคชันโดยใช้ Repository pattern ใน Java Spring Boot โดยปกติแล้วเราจะสร้าง Interface Repository ขึ้นมาแล้วใช้งานผ่าน Service Class เพื่อทำการแยก Logic การทำงานและการเข้าถึงฐานข้อมูลออกจาก Controller Class ซึ่งทำให้เราสามารถทดสอบและจัดการกับข้อมูลได้ง่ายขึ้น
สร้าง Service Class และใช้ Dependency Injection กับ Repository
| UserService.java |
|
@Service เป็น Annotation ที่ใช้สำหรับประกาศ Class เป็น Service Layer ที่ใช้ในการเขียน Business Logic และเป็นตัวกลางในการเชื่อมต่อระหว่าง Controller กับ Repository
การใช้ @Service เพื่อประกาศ Class เป็น Service Layer จะช่วยให้เราแยก Logic ที่เกี่ยวข้องกับธุรกิจออกจาก Controller และ Repository ซึ่งทำให้เราสามารถทำการทดสอบ Logic เหล่านี้ได้อย่างอิสระและง่ายขึ้น โดยทั่วไปแล้ว Service Layer จะใช้งาน Repository เพื่อดึงข้อมูลจากฐานข้อมูลและดำเนินการ Logic ต่อไป
@Autowired เป็นการใช้ Dependency Injection ใน Spring Framework โดยการเชื่อมต่อ Object จากคลาสอื่นๆ ในโค้ด โดยที่ Spring จะทำการสร้าง Object ให้เราโดยอัตโนมัติและเชื่อมต่อให้เราโดยอัตโนมัติเมื่อเราเรียกใช้งาน Method นั้นๆ
ในโค้ดตัวอย่างที่กล่าวถึง การประกาศตัวแปร userRepository และใช้งาน @Autowired นั้นหมายความว่าเรากำลังใช้ Dependency Injection ในการสร้าง Object ของ UserRepository โดยเราไม่จำเป็นต้องสร้าง Object ด้วยตัวเอง โดย Spring Framework จะทำการสร้าง Object ของ UserRepository ให้เราและเชื่อมต่อให้เราโดยอัตโนมัติ ซึ่งทำให้เราสามารถเข้าถึง Repository ได้โดยง่ายและสะดวกสบายมากขึ้นในการเขียนโค้ดของเรา
4. สร้าง Controller Class แล้ว Injection Service Class เข้ามาใช้งาน
| UserController.java |
|
จากตัวอย่างข้างต้น เราใช้ Dependency Injection กับ UserRepository ใน Service Class และเรียกใช้ Method findByUsername เพื่อค้นหา User จากฐานข้อมูล จากนั้นใช้ Service Class ใน Controller Class เพื่อส่งคืนข้อมูลผ่าน API endpoint ต่างๆ
@RestController เป็น Annotation ใน Java Spring Boot ที่ใช้สำหรับประกาศว่า Class เป็น Controller และสามารถรับ Request และส่ง Response กลับไปยัง Client ได้ โดยมีการสร้าง Response ในรูปแบบของ JSON หรือ XML และส่งกลับไปยัง Client โดยอัตโนมัติ
การใช้ @RestController จะมีประโยชน์ในกรณีที่ต้องการสร้าง API หรือการเชื่อมต่อระบบต่างๆ โดยมีความสามารถในการรับ Request และส่ง Response ออกไปยัง Client ได้อย่างรวดเร็วและง่ายดาย
@RequestMapping เป็น Annotation ที่ใช้สำหรับกำหนด URL path ของ HTTP request ที่จะเข้าถึง Controller Method หรือ RESTful API นั้นๆ โดยเราสามารถกำหนด path ได้หลากหลายแบบ เช่น path แบบแนบค่าพารามิเตอร์ หรือ path แบบแยกค่าพารามิเตอร์ด้วยสัญลักษณ์
บทความต่อๆ ไปจะพูดถึง การสร้าง API ด้วย Java Spring Boot
จบบริบูรณ์
Seasoned Senior System Analyst & Developer with over a decade of experience in designing, analyzing, and developing highperformance, scalable applications using a wide range of technologies, including Java, Spring Boot, C#, ASP.NET, MVC, React.js, Kubernetes, Microservices, PostgreSQL, MySQL, Oracle, and Microsoft SQL. Notable Achievements: Consistently delivered projects on time and within budget, ensuring client satisfaction and project success. Demonstrated versatility in working both independently and as a valuable team member, contributing to collaborative achievements. Honored with the prestigious "Employee of the Year" award in 2012 for exceptional dedication and outstanding performance. Recognized as a Microsoft Most Valuable Professional (MVP) for significant contributions to the software development community. My Commitment: I am committed to innovation, excellence, and solving complex technical challenges. I take pride in my ability to consistently deliver robust and efficient software solutions that meet and exceed the expectations of clients and stakeholders.

ใส่ความเห็น